How to Choose Ceramic Media: A 5-Step Selection Framework for Grinding and Mass Finishing Applications
A systematic decision guide covering process type, workpiece material, machine compatibility, shape and size selection, and trial validation — with decision trees, specification tables, and the seven most costly selection mistakes to avoid.
Why Systematic Selection Matters
The ceramic media market offers hundreds of combinations of material, grade, shape, size, and bond hardness. A triangle chip and a cone chip made from the same abrasive grade by the same manufacturer will produce completely different results on the same part. A zirconia bead and an alumina bead of the same size in the same mill will achieve the same target particle size in dramatically different cycle times at dramatically different costs. The permutation space is large enough that an unsystematic approach — ordering what “seems right” or copying a specification from a similar application without validating it — almost always produces suboptimal results.
The five-step framework below resolves this complexity into a linear decision sequence. Each step narrows the specification space, so that by Step 5 you are validating one or two specific candidate media types rather than screening an open-ended field of options. For a conceptual overview of ceramic media types before working through the selection steps, see our What Is Ceramic Media guide.
Before any other selection variable is considered, answer one question precisely: are you trying to reduce a material to smaller particles, or are you trying to improve the surface of an existing manufactured part? These two objectives require completely different product families, and mixing them up produces a specification that fails before it leaves the drawing board.
Within finishing media, define your specific objective before moving to Step 2. The objective determines the target surface finish and therefore the allowable abrasive grade range. Common objectives, in order of aggressiveness:
| Finishing Objective | Starting Condition | Target Ra (µm) | Abrasive Grade Range |
|---|---|---|---|
| Heavy deburring / flash removal | Cast, forged, laser-cut parts with large burrs | 1.6 – 3.2 | Coarse (36–60 mesh) |
| Standard deburring / edge radiusing | CNC-machined, stamped parts | 0.8 – 1.6 | Medium (80–120 mesh) |
| Pre-plate / pre-coat surface prep | After deburring, before coating | 0.4 – 0.8 | Fine (150–220 mesh) |
| Fine surface finishing | Clean parts, surface refinement only | 0.1 – 0.4 | Very fine (320–400 mesh) or non-abrasive |
| Burnishing / bright finish | Post-deburring, cosmetic final stage | < 0.1 (bright) | Non-abrasive porcelain media |
The workpiece drives the specification, not the media supplier’s catalog. Before specifying any media parameter, document the four workpiece characteristics that constrain your options:
1. Workpiece material and hardness. The workpiece material determines which ceramic material grade is safe to use (non-ferrous-safe formulations for aluminum and copper), which compound pH is required, and how aggressively the process can be run before dimensional change or surface damage becomes a concern. A soft aluminum die-casting and a hardened 17-4 PH stainless steel component require completely different media grades and process parameters, even if their burr heights are identical.
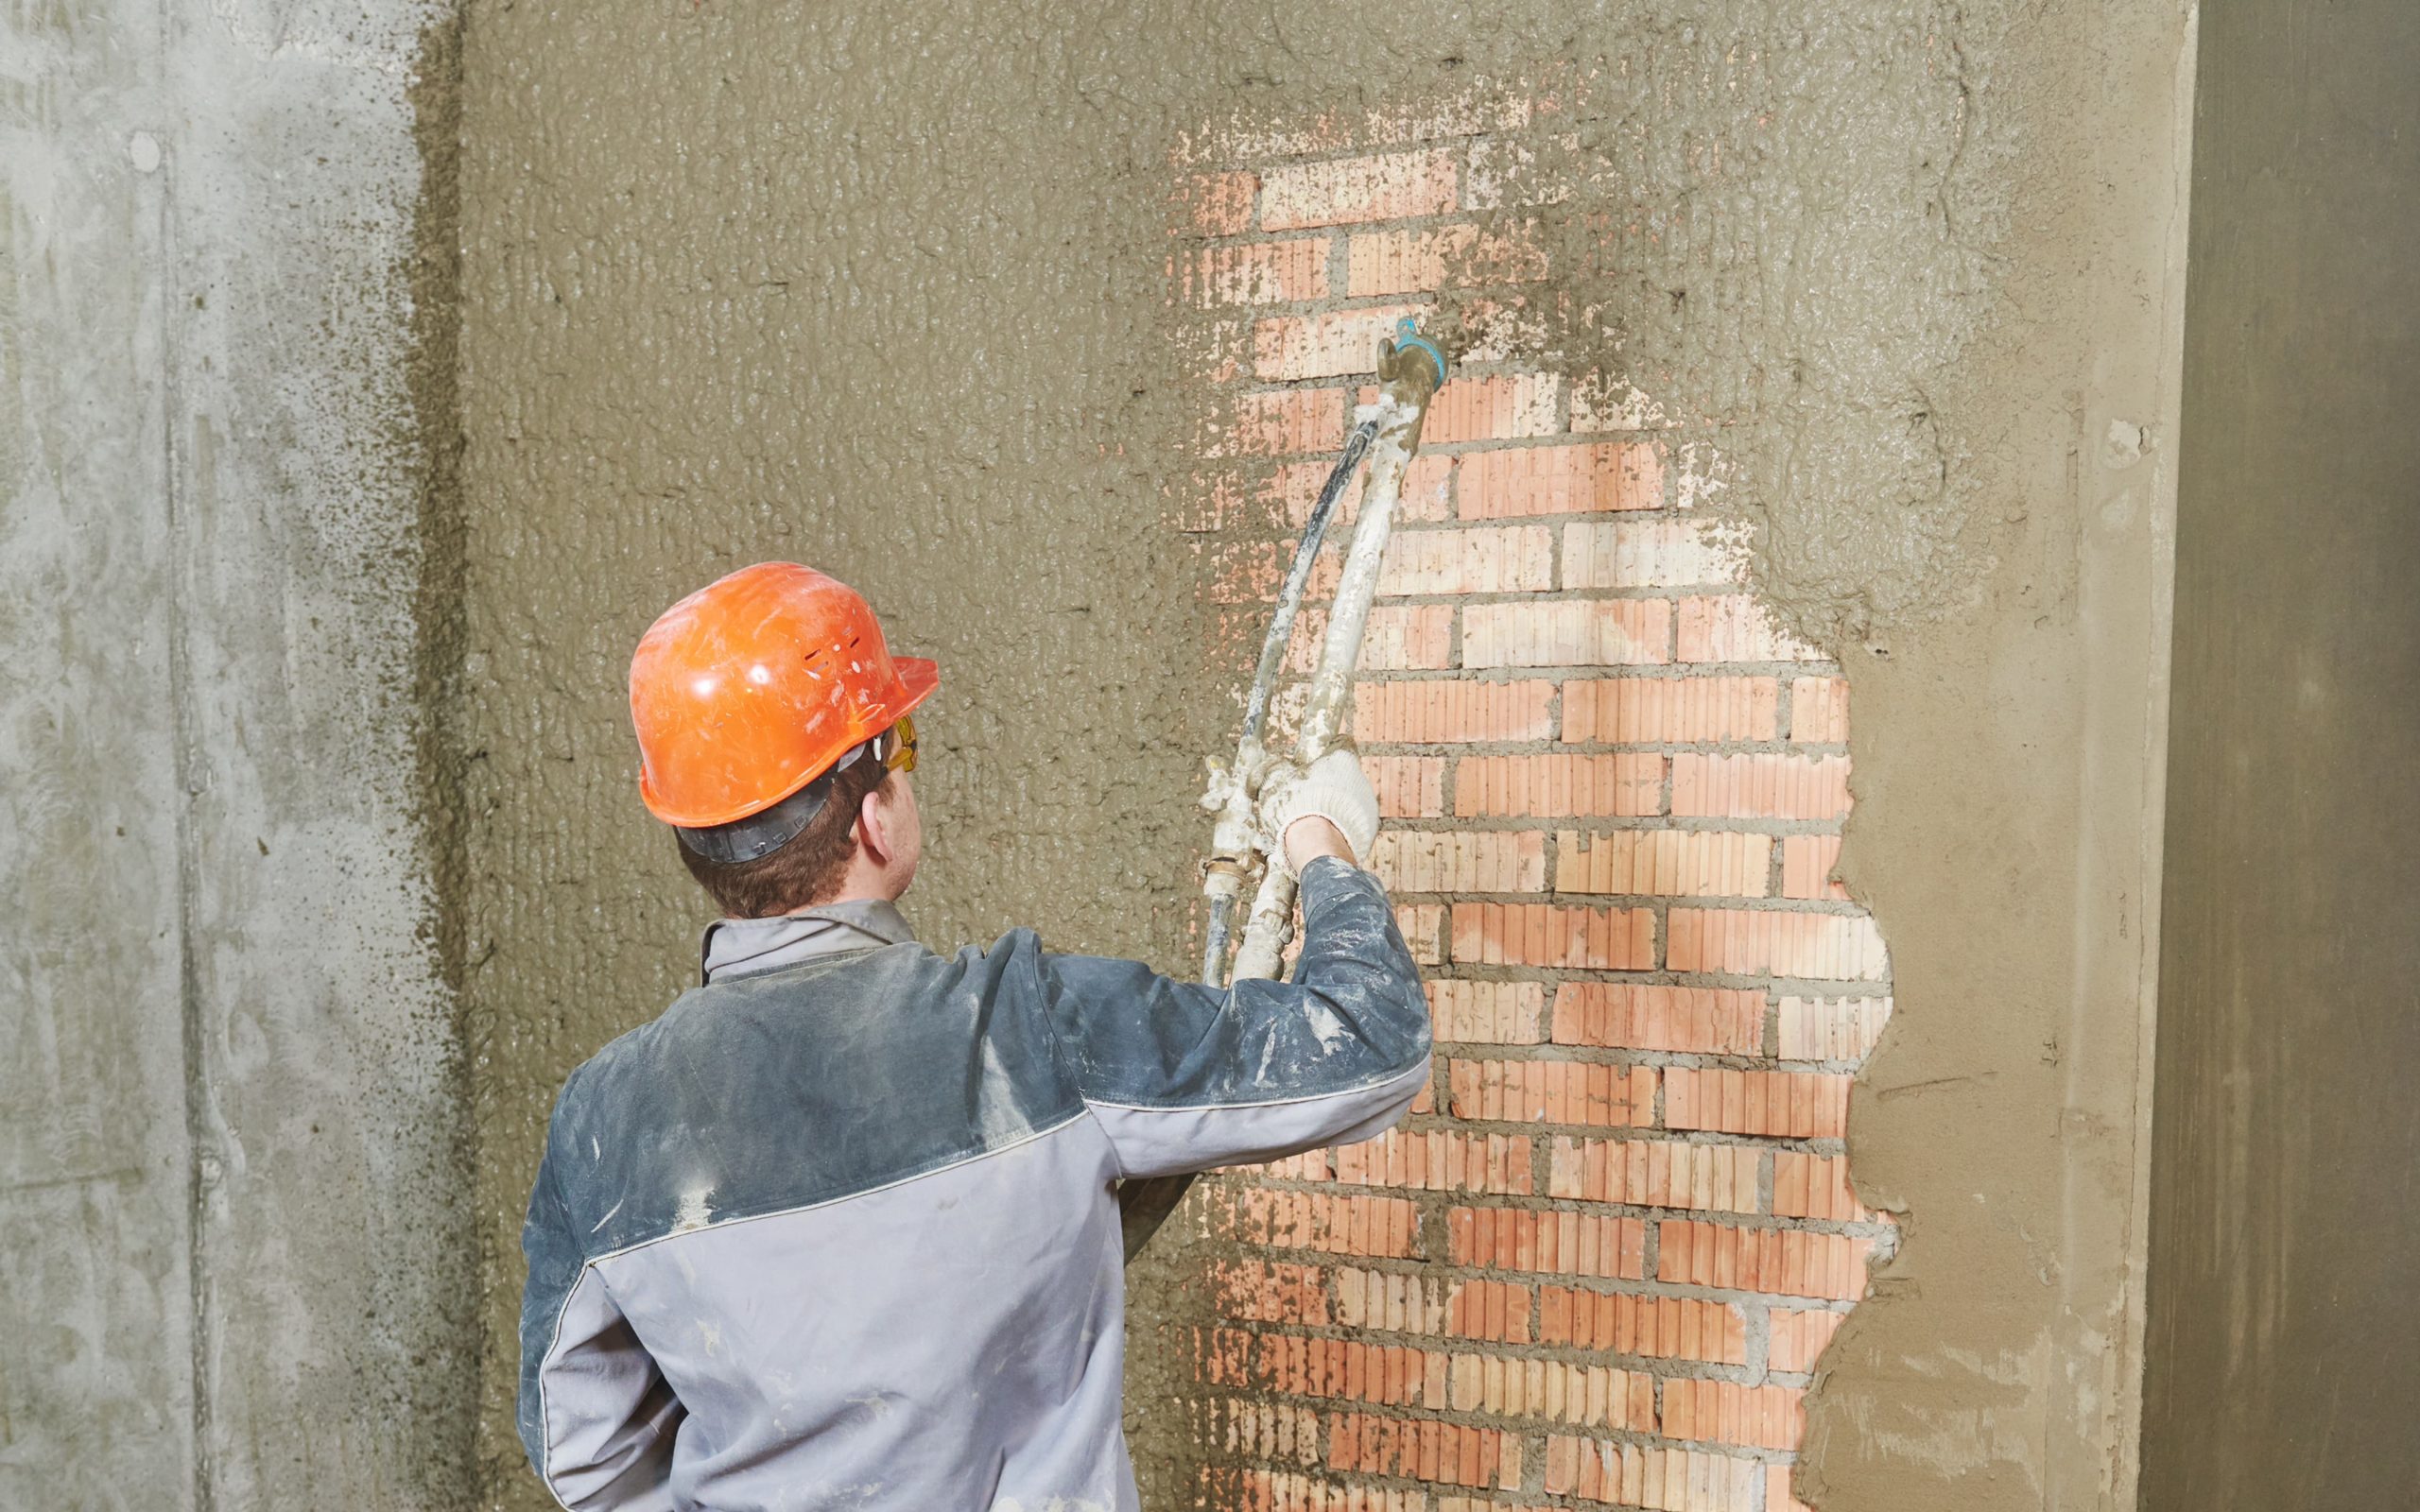
2. Burr type, height, and location. Classify your burr using the taxonomy in our Ceramic Media for Deburring guide: flash/scale (Type 1), machining rollover (Type 2), laser dross (Type 3), stamping rollover (Type 4), cross-bore (Type 5), or thread burr (Type 6). Each type has a different required media aggressiveness. Burr location determines which shape can reach it — a burr at the root of a gear tooth requires a cone, while a burr on a flat machined face is best addressed by a triangle or cylinder.
3. Critical feature sizes — the lodging constraint. Identify every hole, bore, slot, and pocket in the part. The smallest dimension of the media chip must exceed the largest critical opening by at least 25%. This constraint often sets a minimum media size that overrides your initial grade preference. If the lodging constraint forces you to a large chip size that is inefficient for the part scale, consider media stops (plugs) for critical bores or a two-stage process.
4. Post-process requirements. Does the part go directly to plating, painting, anodizing, heat treatment, or assembly after deburring? Each downstream process has surface chemistry requirements. Plating needs a specific surface cleanliness and Ra range. Anodizing is sensitive to surface contamination from iron-bearing media. Assembly with tight tolerances may have edge radius limits. Define these requirements before selecting media so the process is designed to meet them, not retrofitted afterward.
Document your incoming part condition with measurements, not descriptions. “Small burrs” means different things to different people. Measure burr height with a tool microscope or profilometer and record the actual value. “Ra 1.8 µm incoming” is a specification you can design a process around; “rough surface” is not.
Material grade selection for finishing media involves two sub-decisions: the ceramic material family, and the abrasive grit size within that family.
Ceramic material family selection for finishing media is simpler than for grinding media, because contamination levels are generally lower (the chip contacts the part surface rather than dissolving into a product slurry). The key discriminator is workpiece material compatibility:
Abrasive grit size selection follows directly from your target Ra and burr severity defined in Steps 1 and 2. Use the table in Step 1 to identify the appropriate grit range. When in doubt, start with a medium grit (80–120 mesh) — it is easier to extend cycle time for insufficient cut rate than to recover from dimensional damage caused by an overly aggressive coarse grade.
For a complete technical analysis of all ceramic material families including density, hardness, chemical resistance, and contamination profiles, see our Ceramic Media Materials guide.
Shape selection is the variable most frequently under-specified in the ceramic media selection process. Many buyers specify material grade and size correctly but default to triangle chips for every application — missing the substantial performance improvement available from a geometry-matched shape.
Shape selection principle: match the chip geometry to the feature that needs treatment. For external flat faces and edges, the triangle maximizes cut rate. For complex geometry with recesses, grooves, and intersecting bores, diagonal cylinders and cones are superior. For final polishing with no burr removal requirement, the sphere is the only appropriate choice. For a complete shape-to-application mapping, see our Ceramic Media Shapes Guide.
| Primary Feature to Treat | First-Choice Shape | Second-Choice Shape |
|---|---|---|
| Flat faces, external edges | Triangle | Cylinder |
| Cylindrical / turned parts | Straight cylinder | Angle-cut cylinder |
| Deep grooves, gear teeth, splines | Cone / Tri-Star | Diagonal cylinder |
| Complex castings, intersecting bores | Diagonal cylinder | Cone |
| Polishing, burnishing, delicate parts | Sphere | Fine cylinder |
| Mixed geometry, job shop batches | Angle-cut cylinder | Triangle |
Size selection: apply the anti-lodging rule first, then optimize within the safe range. Calculate the minimum allowable media dimension: it must exceed the largest critical opening in the workpiece by at least 25% (×1.25 factor). This gives you the minimum size floor. Within the safe size range, smaller chips reach finer features and produce smoother final Ra; larger chips deliver more cutting force per contact event and faster stock removal on heavy burrs. For a standard vibratory deburring application, start at the minimum safe size and increase if cut rate is insufficient.
Do not use the nominal side length of a triangle chip as the critical dimension. The diagonal of a triangle — which is the longest dimension across any orientation — is the dimension that can enter and wedge in a slot or bore. For a 15 mm triangle chip, the diagonal is approximately 17.3 mm. Apply the anti-lodging formula to the diagonal, not the side length.
The five variables of a vibratory finishing process specification are: media grade and shape, media-to-parts volume ratio, machine amplitude, compound type and concentration, and cycle time. Steps 1–4 determine the first variable. The remaining four are set through the following starting points, then refined by trial:
| Parameter | Starting Point | Adjust If… |
|---|---|---|
| Media:Parts ratio (vol.) | 4:1 | Increase to 5–6:1 for delicate parts; decrease to 3:1 for robust parts if cut rate is too slow |
| Total bowl fill | 85% of bowl volume | Never below 80% (reduced circulation) or above 92% (media overflow) |
| Machine amplitude | Maximum rated amplitude | Reduce by 30–50% for thin-wall or delicate parts to prevent part-on-part impact |
| Compound pH | Alkaline (pH 8.5–10) for steel; neutral (pH 6.5–7.5) for stainless and titanium; mildly acidic (pH 5.5–6.5) for aluminum | Verify with pH meter at the bowl, not just the compound spec sheet — dilution changes pH |
| Compound flow rate | 80–150 mL/min per 200 L bowl volume | Increase if bowl appears dry or swarf builds up; decrease if parts are excessively slippery |
| Cycle time | Based on burr type: heavy = 60–90 min; standard = 30–45 min; light = 15–25 min | Establish actual minimum via timed interval inspection (see trial protocol below) |
- Load the machine with the specified media charge, compound, and a single batch of production parts at the calculated media:parts ratio. Confirm bowl fill is at 80–88%.
- Run to 25% of expected cycle time, then stop the machine and pull three representative parts. Inspect for burr reduction and surface roughness. Record measurements.
- Run to 50%, pull three more parts, inspect, and record. If burrs are fully removed at this point, your minimum viable cycle time is at or before 50%.
- Run to 75%, inspect, and record. Compare the Ra improvement from 50% to 75% against the improvement from 0% to 50% — this reveals the diminishing-returns rate.
- Run to 100%, inspect, and record. Plot the full process curve (time vs. Ra, time vs. burr height). Set the production cycle time at the point where burrs are first fully removed, plus a 15–20% buffer.
- Document the validated process: media lot number, machine serial number, amplitude setting, compound batch number and concentration, flow rate, and cycle time. This document is the production process specification.
Separate Track: Choosing Ceramic Grinding Media
If your Step 1 determination was that you need ceramic grinding media (beads for a ball mill or bead mill), the selection logic differs from finishing media in three important ways: shape is almost never a variable (beads are always spherical), contamination is often a critical constraint, and the density of the bead is the primary driver of grinding efficiency.
For bead size selection in grinding media, the general principle is that the optimal bead diameter is approximately 10–30 times the target final particle size. For a target of 1 µm, that suggests a bead diameter of 0.3–0.8 mm. Bead size must also be compatible with the mill gap — typically the bead diameter should be 3–6 times smaller than the mill gap to prevent jamming. For a complete technical treatment of grinding media selection, see our dedicated Ceramic Grinding Media guide.
📄 Related: Ceramic Media Materials — Alumina vs. Zirconia vs. SiC vs. Porcelain Full technical comparison of all four ceramic material families including contamination profiles and cost-of-ownership analysisSeven Costly Selection Mistakes and How to Avoid Them
The following mistakes are consistent across ceramic media applications and account for the majority of process failures encountered during new application development. Each one has a straightforward preventive action.
-
1Selecting grade before shapeChoosing the abrasive grade first, then selecting shape as an afterthought. A perfectly specified grade will underperform dramatically if the chip geometry cannot reach the burr location. Always select shape first based on the workpiece geometry, then optimize grade for cut rate.
-
2Applying the anti-lodging rule to chip side length instead of diagonalA 15 mm triangle chip has a diagonal of approximately 17.3 mm — the dimension that determines lodging risk in rectangular and irregular features. Using the 15 mm side length understates lodging risk by ~15% and is a common cause of media embedding in production parts.
-
3Using standard alumina on non-ferrous workpiecesStandard alumina ceramic contains iron oxide as a sintering aid. On aluminum, copper, brass, and zinc workpieces, this iron introduces galvanic contamination that causes surface darkening and uneven anodizing. Always specify non-ferrous-safe ceramic for non-ferrous workpieces.
-
4Running a fixed cycle time without interval inspectionSetting a cycle time based on supplier recommendation or prior experience without running timed interval inspections on the actual part. The process curve varies between part geometries, incoming burr conditions, and media lots. An uninspected fixed cycle time is either too long (waste) or too short (defective parts escaping).
-
5Neglecting compound concentration monitoringCompound dilution drifts during production due to evaporation, drag-out on parts, and flow rate variation. A process validated at pH 9.0 may drift to pH 7.5 within a shift — dramatically changing cut rate and surface finish consistency. Measure compound pH and conductivity at the bowl, not just at the supply tank, on every shift.
-
6Choosing zirconia grinding media for all milling applications regardless of productZirconia’s superior performance in high-energy milling of contamination-sensitive products does not make it the right choice for all grinding applications. For construction aggregates, mineral pigments, and other contamination-tolerant products ground in conventional ball mills, standard alumina delivers the same practical result at one-eighth the media cost. Specify zirconia where its specific advantages — density, wear rate, purity — are actually required by the application.
-
7Failing to screen fines from an aging media chargeAs ceramic chips wear, undersized fragments accumulate in the bowl. These fines occupy bowl volume without contributing useful cut rate, but — more critically — they have reduced below the anti-lodging minimum size and can lodge in part features that the original chip size safely avoided. Implement a regular fines-screening schedule (monthly minimum in continuous production) and replace fines with fresh media of the original size.
Frequently Asked Questions
Shape — specifically, whether the chip geometry can make direct contact with the burr location on the workpiece. A chip with the correct abrasive grade but wrong shape will deliver little useful work if it cannot access the burr. Shape selection should always precede grade selection in the specification process. The second most important variable is the anti-lodging size rule — getting size wrong has the most immediately damaging consequences (lodged media, scrapped parts) of any selection error.
Always. No specification — however carefully derived — substitutes for a validated trial with your specific part, machine, and compound. Reputable ceramic media manufacturers, including Jiangsu Henglihong Technology, provide trial samples at no cost for genuine industrial applications. Run the validated trial protocol described in Step 5 with the sample media before placing a production order. This investment of a few hours prevents the much larger cost of a full production lot of incorrectly specified media.
The key decision factors are part size, workpiece hardness, and required cycle time. If parts are larger than 150 mm in any dimension, vibratory is the practical choice — centrifugal barrel machines have small barrel volumes that cannot accommodate large parts. If the workpiece is hardened steel (above HRC 45) or titanium alloy, centrifugal barrel is preferred because it generates 5–25 G vs. 1 G in vibratory machines — the higher energy is needed to cut efficiently against hard materials. If cycle time is the primary constraint and part size allows CBF, centrifugal barrel reduces cycle time by 5–30× compared to vibratory for the same media and part combination.
Sometimes, but only if your part family has consistent geometry, material, and burr characteristics. A single “general-purpose” medium-cut triangle in a common size handles a surprisingly wide range of standard machined steel parts. However, as soon as any part in the family has a non-ferrous material, critical internal features at lodging risk, hardened surfaces, or a precision surface finish requirement, a single grade will either underperform or over-process one or more part numbers. In high-mix manufacturing environments, the most efficient approach is usually one standard grade that covers 70–80% of parts, with two or three specialty specifications for the outliers — not one universal grade that handles nothing optimally.
There are three reliable indicators. First, cycle time increases progressively: if the same part that previously deburred in 30 minutes now requires 45 minutes with identical machine settings and compound, the media charge has worn and its cut rate has declined. Second, fines buildup: when a size-screen of the bowl charge reveals that more than 20–25% of the chip volume has fallen below the minimum acceptable size, top up or replace. Third, direct chip measurement: measure a sample of chips from the bowl and compare to the original nominal size. When the average chip dimension has worn to below 60–65% of original, replacement performance drops significantly and should trigger media replacement.
Need Help Specifying Ceramic Media for Your Application?
The engineering team at Jiangsu Henglihong Technology Co., Ltd. works through the 5-step framework with you — at no cost — and provides trial samples so you can validate before committing to a production order.
Start Your Free Media Specification →Filters