Plastic Media Blasting for Automotive Paint Stripping
Stripping paint from a vehicle is one of those tasks that sounds straightforward until you are actually doing it. Chemical strippers are slow, hazardous, and produce contaminated waste streams that require careful disposal. Sandblasting is fast but routinely warps door skins, thins panel metal, and leaves surfaces so rough they need extensive body filler work before primer can go on. Heat guns and mechanical grinding are brutally labor-intensive and create inconsistent results across complex panel geometry.
Plastic media blasting — the process of propelling engineered polymer abrasive particles at panel surfaces using compressed air — has emerged as the preferred paint stripping method in professional restoration shops, collision repair facilities, and military vehicle maintenance programs precisely because it avoids all of these problems. Done correctly, it strips a vehicle body to bare metal cleanly, quickly, and without warping, thinning, or dimensionally altering the panels underneath.
This guide covers everything you need to know to use plastic media blasting effectively for automotive paint stripping: how it compares to alternatives, which media to use on which panels, the exact process parameters for different substrates, what to do after blasting, and the common mistakes that turn a fast strip job into an expensive rework problem. For a broader overview of plastic media types, start with: What Is Plastic Media? The Complete Guide.
Why Plastic Media for Automotive Paint Stripping?
The core problem with stripping automotive panels is the tension between two requirements that pull in opposite directions: you need enough abrasive energy to remove paint completely, but not so much that you damage the metal underneath. Automotive sheet steel panels — particularly on classic vehicles — are typically 18–22 gauge (0.048–0.029 inches thick). Modern unibody stampings and door skins can be even thinner. At these gauges, the margin between “strips paint cleanly” and “warps the panel” is narrow.
Plastic media occupies that margin precisely because its hardness is deliberately engineered to be lower than the metals it is used on. A Type II urea particle at Mohs 3.5 fractures when it contacts steel (Mohs ~4.5) or aluminum (Mohs ~2.5–3.5 depending on alloy). This fracture behavior transfers energy into the coating layer above the metal — delaminating it — while delivering insufficient energy to plastically deform the metal below. The result: paint off, metal unchanged.
The three specific benefits that make plastic media the professional standard for serious automotive work are:
- No panel warping. The heat and mechanical force of sandblasting or grinding causes thin sheet metal to warp and oil-can. Plastic media’s lower impact energy does not generate enough localized heat or mechanical deformation to distort properly-supported panels.
- No metal thinning. Mineral abrasives remove metal along with paint. Plastic media, because it fractures at the metal surface rather than cutting into it, does not measurably reduce metal thickness even after multiple passes.
- Complete chemical strip alternative. Plastic media removes all coating layers — primer, basecoat, clearcoat, undercoating — in a single operation without the wait time, surface neutralization requirements, or hazardous waste streams of chemical stripping.
How It Compares to Other Strip Methods
- No panel warping
- No metal thinning
- Complete strip in one pass
- Safe on steel & aluminum
- No neutralization needed
- Moderate cost per panel
- Requires blast equipment
- Best result overall
- No mechanical damage
- Reaches all cavities
- Slow (hours to days)
- Requires neutralization
- Hazardous waste stream
- Can attack spot welds
- High disposal cost
- Good for rust removal
- Fast strip rate
- Warps thin panels
- Thins metal over time
- Leaves high profile
- Requires heavy fill/prime
- Creates silica dust risk
- Not suitable for resto
- OK for frames/heavy steel
- Very slow
- Burns wiring/trim
- Warps panels
- Fire risk
- Releases toxic fumes
- Leaves adhesive residue
- Not professional-grade
- Only for small areas
- Very gentle on metal
- Leaves alkaline residue
- Must be fully neutralized
- Slow on thick coatings
- Cannot reuse media
- Soft metal compatible
- Higher per-use cost
- OK for light coatings
Choosing the Right Media: Type & Mesh
For automotive paint stripping, the media type and mesh selection depends on two variables: the substrate material (steel vs. aluminum vs. fiberglass) and the coating system thickness and hardness. Here is the complete selection framework:
| Application | 媒体类型 | Mesh Size | 原因 |
|---|---|---|---|
| Standard steel body panels (OEM multi-layer paint) | Ⅱ型尿素 | Mesh 20–30 | Medium aggressiveness efficiently strips lacquer, enamel, or urethane layered systems without warping thin gauge steel |
| Aluminum body panels (modern vehicles) | Ⅱ型尿素 | Mesh 30–40 | Finer mesh and lower pressure protect softer aluminum alloys from any profile change; aluminum work-hardens unpredictably under over-blasting |
| Classic car panels with heavy original lacquer (>1960s) | Ⅱ型尿素 | Mesh 20 | Heavy old lacquer may need more aggressive particle size; coarser Mesh 20 combined with controlled pressure balances throughput and panel safety |
| Chassis, frame rails, subframe (heavy steel) | Type II or Type III | Mesh 16–20 | Heavy structural steel tolerates more aggressive media; Type III melamine speeds strip rate on thick underseal and heavy enamel on chassis |
| Fiberglass body panels (kit cars, Corvette, etc.) | Type V Acrylic | Mesh 30–40 | Fiberglass gelcoat requires gentle acrylic media; urea at standard pressure risks fiber mat exposure — see Type V Acrylic Guide |
| Filler-over-steel areas (Bondo, polyester filler) | Ⅱ型尿素 | Mesh 20–30 | Plastic media removes filler along with paint cleanly; the filler’s lower hardness means it clears faster than the paint layers above it |
| Undercoating / rubberized underbody coating | III 型三聚氰胺 | Mesh 16–20 | Thick elastic undercoating resists brittle-fracture abrasive removal; harder melamine provides the additional impact energy needed for efficient undercoating strip |
| Spot repair (single panel) | Ⅱ型尿素 | Mesh 30 | Conservative mesh reduces overshoot risk on a single valuable panel being stripped in isolation |
Substrate Guide: Every Automotive Material
Modern and classic vehicles contain a wider range of substrate materials than most operators realize. Here is a complete compatibility guide for every material you will encounter in automotive work:
Use Case Deep Dives
Classic Car Full-Body Restoration
Full-body strip for restoration is the highest-profile automotive application for plastic media blasting — and the one where its advantages over competing methods are most decisive. A classic car restoration strip requires removing every layer of paint, primer, filler, and undercoating from every exterior panel, often including the floor pans and firewall, to reveal the original factory steel in a condition that allows assessment of rust and previous bodywork repairs.
The critical restoration requirement is that the strip process must not introduce new problems to solve. Sandblasting, which many shops used for decades, creates panel warping that requires expensive metal straightening before any bodywork can begin — effectively adding a full metalwork step that wasn’t needed before blasting. Chemical dipping reveals all the original metal but may introduce hydrogen embrittlement into high-strength steel structural members and attacks spot weld adhesive in modern vehicles. Plastic media blasting strips to bare metal cleanly, without distortion, and delivers panels in a condition where existing rust and filler are visible and treatable without new mechanical damage to address.
For a complete body shell, expect to work through the entire exterior including door jambs, engine bay, trunk, and floor pans. Tightly enclosed areas (inside door cavities, behind fender liners) cannot be reached by blast and require either chemical treatment or dedicated cavity spray corrosion protection. Disassembly of glass, trim, rubber, and mechanical components before blasting is essential — the blast operation should be performed on a bare shell with all removable components stripped out.
Individual Panel Strip & Repaint
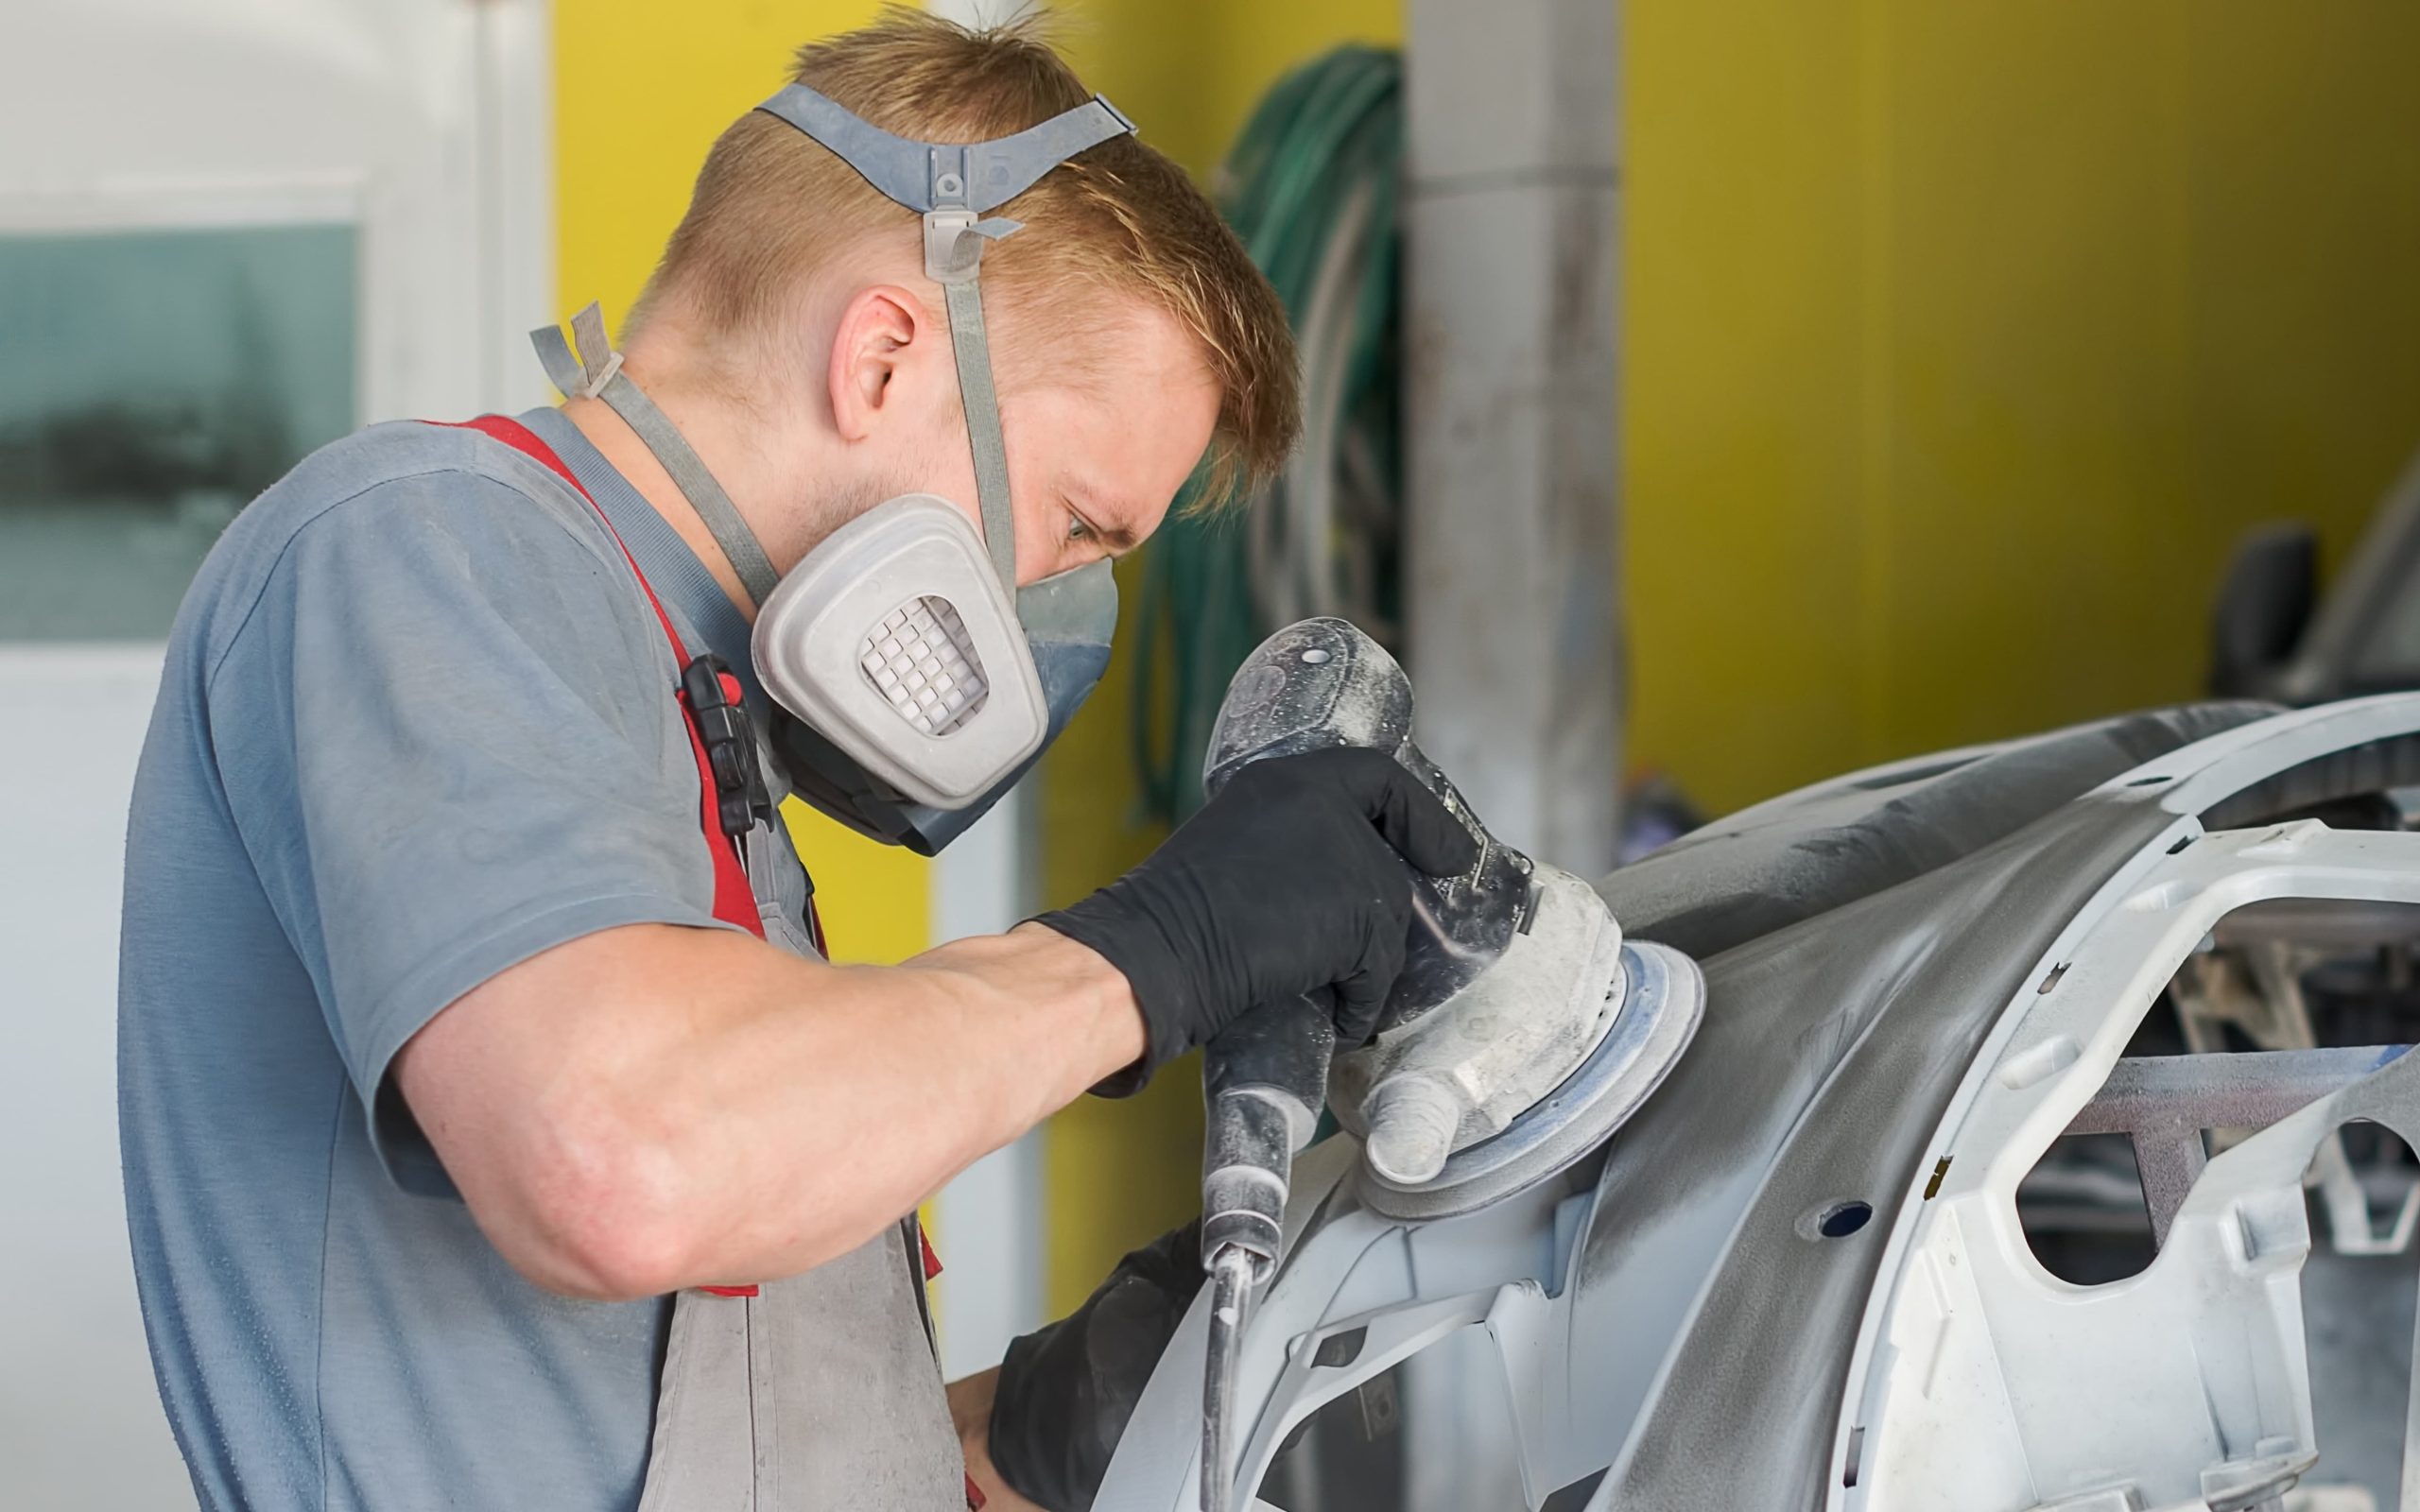
Stripping a single panel — a replacement door, a hood with delaminating clear coat, a fender with localized rust — for repaint is the most common day-to-day automotive plastic blast application. The challenge here is achieving a clean bare metal result on the target panel without damaging adjacent panels, trim, or glass that remain on the vehicle.
Individual panel blasting requires careful masking of adjacent surfaces and protective covering of glass, rubber, and any non-removable trim. Because the blast stream is concentrated on a smaller area, there is a higher risk of dwell-induced warping if the nozzle is not kept moving consistently. Shorter standoff distances (6–8 inches) and lower pressures (25–35 PSI) than full-body work are appropriate for door skins and fenders, where achieving the minimum effective pressure for coating removal is more important than strip speed.
After blasting, inspect the bare steel for any remaining paint in recessed areas (body lines, door handles, trim clip holes). These areas often require a follow-up pass with the nozzle at a different angle to drive media into the recess. A water mist test — lightly misting the panel and watching water bead or sheet — reveals any remaining paint or contamination that will interfere with primer adhesion before the surface appears clean to the eye.
Collision Repair Strip-to-Metal
In collision repair, stripping paint from a damaged area before metal straightening or panel replacement serves two purposes: it exposes the full extent of the damage (which is often hidden under paint and filler), and it provides bare metal for optimal weld adhesion if replacement panels are being welded in. Plastic media blasting is increasingly specified by collision repair standards (including OEM position statements from several manufacturers) as the preferred preparation method for aluminum-intensive vehicle platforms.
The collision repair context adds a time-pressure dimension not present in restoration work. Cycle times matter for shop productivity, and the ability to strip a damaged area to bare metal in minutes — rather than waiting hours for chemical stripper to work or spending labor hours grinding — has direct economic value. A well-set-up plastic blast cabinet with reclaim allows a skilled operator to strip a typical collision-damaged quarter panel in 15–25 minutes, producing a clean weld-ready surface.
For mixed-material modern vehicles where aluminum stampings meet steel structural members, the transition zones require particular care — the parameters for aluminum (lower pressure, finer mesh) must be used across the entire repair area if any aluminum surfaces are present, even if most of the area is steel. Using steel-appropriate parameters on an area that includes aluminum panels will cause aluminum distortion and potential metallurgical damage that is difficult to assess and nearly impossible to reverse.
Chassis & Frame Preparation
Vehicle chassis, frame rails, subframes, and suspension components are the one area of automotive work where somewhat more aggressive plastic blast parameters — or even a transition to Type III melamine — can be justified. Chassis steel is typically heavier gauge (10–14 gauge structural steel in full-frame vehicles), and the surface preparation requirement before chassis coating (epoxy primer + topcoat, or chassis paint) benefits from a slightly more aggressive anchor profile than thin panel work.
Underseal and rubberized underbody coating, which is common on chassis from the 1960s onward, is resistant to removal by standard urea blast parameters. The elastic nature of underseal absorbs impact energy and resists brittle-fracture removal — it bends rather than breaks under each particle impact. Type III melamine’s higher hardness and impact energy overcomes this resistance more efficiently, and on heavy chassis steel, the more aggressive profile it creates actually improves subsequent coating adhesion. For chassis work on heavier structural sections, Type III at Mesh 16–20 and 45–60 PSI is a practical and economical choice.
Suspension components — control arms, spindles, differential housings — often have complex geometry with internal cavities, threaded features, and pressed-in bushings that require either careful masking before blasting or complete disassembly with bushing removal before blast exposure. Never blast suspension components with bushings in place; even plastic media will damage rubber bushings and polyurethane inserts.
Modern Aluminum-Body Vehicles
The proliferation of aluminum-intensive vehicle platforms — Ford F-150, Jaguar XE/XF, Audi A8, Range Rover, and many others — has created a significant qualification challenge for automotive refinish and restoration operations. These vehicles use 5xxx and 6xxx series aluminum alloys for body panels, and in some cases 7xxx series high-strength aluminum for structural members. Each alloy has different hardness, temper sensitivity, and response to blast media impact energy.
The fundamental rule for all aluminum-body work: use Type II Urea at Mesh 30–40 and do not exceed 35 PSI without a material-specific qualification test. Aluminum’s lower hardness compared to steel means the substrate-damage window is narrower, and the consequences of over-blasting — micro-cracking at grain boundaries, work hardening that reduces formability, surface contamination from media embedment — are metallurgically significant and may affect structural repair assessment.
Several OEM manufacturers have issued position statements on repair procedures for aluminum-intensive vehicles that specify acceptable surface preparation methods. Before performing plastic blast stripping on any late-model aluminum-body vehicle in a collision repair context, check the OEM repair procedure database for that specific vehicle platform. Failure to follow OEM-specified procedures may affect warranty coverage and structural repair certification. The general principles in this guide apply, but OEM documentation takes precedence for certified repair work.
Blast Parameters by Substrate
These are the proven operating parameters for automotive plastic media blasting, consolidated by substrate type for quick reference during setup:
Step-by-Step Blasting Process
Preparation and Masking
Remove or protect everything that should not be blasted. For a full-body strip, the vehicle should be completely disassembled — glass out, all trim removed, all rubber weatherstrip pulled, wiring looms disconnected and removed from the body, fuel and brake lines removed or routed away. For panel work on a partial vehicle, mask adjacent glass with 3 layers of heavy masking paper plus rigid sheeting over windshield and rear glass, tape off rubber seals with 2 layers of duct tape minimum, and hang drop cloths over adjacent panels if blast overspray is a concern.
Inspect the vehicle for lead body solder. Pre-1970 vehicles commonly have lead filler at rear quarter panel seams, roof-to-body joints, and trunk lid edges. If lead is present, full lead abatement protocols apply before blasting begins.
For classic car full-body work, photograph the entire vehicle before blasting. Pre-blast photos document any existing damage, dents, and rust that might later be attributed to the blast process.
Equipment Check and Media Verification
Verify blast media type and mesh size against the substrate specification. Check media moisture — clumping or erratic nozzle flow indicates moisture-contaminated media that must be replaced before production blasting. Inspect the nozzle bore for wear; a worn (bell-mouthed) nozzle produces a diffuse, low-velocity blast pattern that reduces strip rate and increases media consumption without a proportional improvement in results. Standard automotive nozzle bore is 3/8 inch; replace when bore has worn more than 1/16 inch oversize.
Verify compressor output is adequate for the selected nozzle size. A 3/8-inch nozzle at 40 PSI requires approximately 150–175 CFM of free air delivery. Undersized compressors cause pressure sagging during blasting that produces inconsistent results across a panel.
Test Pass on a Representative Coupon or Hidden Area
Before blasting visible panels, run a 30-second test pass on a hidden area of the vehicle (inside a door jamb, under the trunk lid, or on a separate coupon of the same steel gauge) at your target parameters. Inspect the result: paint should be fully removed and the bare metal should show a light, even matte texture with no visible gouging, warping, or directional scratch pattern. If paint remains after two overlapping passes, increase pressure in 5 PSI increments. If the metal shows any directional scratch pattern or distortion at the test area, reduce pressure or increase mesh fineness before proceeding.
Systematic Panel Blasting
Work one panel section at a time using overlapping passes — each nozzle sweep should overlap the previous by approximately 30–40% to ensure consistent coverage. Maintain a consistent nozzle travel speed across the panel; dwell in any area concentrates energy that can warp thin metal. Work with the nozzle slightly across the panel width (not parallel to a body line), which prevents the formation of directional parallel streaks in the finished surface.
On body panels with character lines, raised features, or recessed areas, the blast stream at 80° impingement will not fully clean these recesses in a single pass. After completing the main panel face, return to recessed body lines and trim holes with the nozzle repositioned at a shallower angle (40–60°) to drive media into recesses.
Work top-to-bottom on vertical panels (doors, quarters, fenders) so that paint debris from upper areas does not redeposit on just-blasted lower areas. On horizontal panels (hood, trunk lid, roof), work from one end to the other in a consistent direction.
Inspect for Complete Coating Removal
After each panel section is blasted, inspect under good lighting — ideally raking light at a shallow angle across the panel surface, which makes any remaining paint or primer visible as a color and texture contrast against the bare metal. A white glove or lint-free cloth wiped across the surface reveals any remaining contamination as color transfer. Spot-treat any areas with remaining paint before moving to the next section.
For collision repair work, this inspection step is where the full extent of previous damage, hidden rust, and sub-surface filler becomes visible for the first time. Document findings with photographs immediately after blasting, before any surface treatment, for insurance documentation purposes.
Post-Blast Cleaning and Immediate Surface Treatment
Immediately after blasting, blow off all loose media dust and paint debris with clean, dry compressed air. Follow with a wipe-down using a lint-free cloth dampened with isopropyl alcohol (IPA) to remove any remaining fine dust and contamination. Do not use MEK, acetone, or lacquer thinner for post-blast wipe — these aggressive solvents can leave residue that interferes with primer adhesion and can attack any acrylic media particles that remain on the surface.
Apply primer within the prime window — maximum 4 hours from bare metal exposure for steel, 2 hours in humid conditions. Bare steel oxidizes rapidly, and any surface rust that forms before primer application will undermine the long-term corrosion resistance of the repair. Epoxy primer is the preferred first coat over bare blasted steel, providing the best combination of adhesion, corrosion resistance, and compatibility with subsequent topcoat systems.
After Blasting: Surface Treatment & Primer Window
What happens in the hours immediately after blasting is as important as the blasting itself. The bare metal surface produced by plastic media blasting is chemically active — it begins oxidizing within minutes of air exposure, and the surface profile created by blasting provides nucleation sites for rapid flash rust formation in humid conditions. Here is the correct post-blast sequence:
- Leave blasted steel exposed overnight before priming
- Wipe surface with MEK or acetone (leaves residue)
- Apply filler or putty directly over bare blasted steel without primer
- Apply water-based primer in high-humidity conditions immediately after blast
- Re-blast flash-rusted panels without removing rust first
- Sand blasted surface before priming (removes profile, reduces adhesion)
- Compressed air blow-off immediately after blasting
- IPA wipe with lint-free cloth to remove fine dust
- Visual and tactile inspection for remaining paint
- Apply epoxy primer within 4 hours (2 hours in high humidity)
- Allow epoxy to cure per manufacturer specification before body filler
- Apply seam sealer to any exposed seams or weld joints
- Block sand epoxy primer before applying surfacer/guide coat
Primer Selection After Plastic Media Blasting
| Primer Type | Best For | Over Blasted Steel | Over Blasted Aluminum | Notes |
|---|---|---|---|---|
| 2K Epoxy Primer | Restoration, high-quality repair | First choice | First choice | Best corrosion resistance; requires overnight cure before filler application |
| Self-Etching Primer | Fast production, collision repair | Good | Excellent on aluminum | Fast turnaround; etching chemistry improves aluminum adhesion; not as corrosion-resistant as epoxy long-term |
| DTM (Direct-to-Metal) Primer | Commercial / fleet | Acceptable | Check formulation | Faster than 2K epoxy; corrosion resistance varies by brand; verify compatibility with topcoat system |
| Weld-Through Primer | Panel replacement joints | Required at weld zones | Steel welds to Al structures | Applied before welding; burned off at weld zone; protects adjacent blasted metal; not a substitute for corrosion primer on broad areas |
| Waterborne Primer | Low-VOC environments | Delay in humidity >70% | Acceptable | Flash rust risk is higher with waterborne systems in humid conditions; apply only in controlled shop environment; not recommended as first coat in high humidity |
Cost Comparison: All Strip Methods
Understanding the full cost of each strip method — not just the media or chemical price — is essential for making an informed process selection. Here is a cost comparison for a typical full-body strip of a mid-size classic car (approximately 200 square feet of exterior surface):
*Estimates based on $75–$100/hr shop labor rate. Rework costs from warped or over-thinned panels not included in sandblasting estimate but can add significantly to total.
Equipment Setup for Automotive Work
Setting up a plastic media blast system specifically for automotive paint stripping requires attention to several components that differ from a general-purpose blast setup:
Compressor Requirements
Plastic media blasting for automotive work requires a compressor capable of delivering sustained airflow at nozzle pressure — not just peak pressure. A 3/8-inch nozzle at 40 PSI requires approximately 150–175 CFM of actual free air delivery. Most shop compressors in the 5–10 HP range deliver 15–30 CFM, which is grossly insufficient for sustained blast operation. Automotive shops that perform in-house blast work typically use industrial rotary screw compressors in the 25–75 HP range, or rent a towable diesel compressor for occasional full-body strip jobs. Attempting to blast with an undersized compressor produces continuous pressure drop that makes consistent results impossible.
Blast Cabinet vs. Open-Room Blasting
Full-body automotive strip is typically performed in an enclosed blast room rather than a blast cabinet — the vehicle is simply too large for any practical cabinet. A dedicated blast room with adequate ventilation (media and paint dust collection), floor recovery system (for media reclaim), and good lighting is the professional setup. For individual panel work, a large walk-in blast cabinet with a conveyor or turntable can handle door-sized panels. Portable blast pots with vacuum recovery attachments are used for on-vehicle spot work where moving panels to a dedicated blast facility is not practical.
Reclaim System for Automotive
Media reclaim is essential for the economics of automotive plastic blast work to make sense. A floor recovery system (auger or pneumatic conveyor) collects used media from the blast room floor, passes it through an air wash separator to remove paint debris and fines, and returns it to the blast pot for reuse. Without reclaim, the media cost per vehicle becomes prohibitive. A proper reclaim system extends media life to 4–6 cycles, reducing effective media cost by 75–80% compared to single-use operation.
Safety: PPE and Ventilation
Respiratory Protection
Supplied-air respirator (NIOSH-approved) for blast room work. Minimum P100 half-face respirator for media loading and inspection when not in active blasting. Standard dust masks are not adequate for plastic blast media dust.
Eye & Face Protection
Full-face blast hood with lens protector for any active blasting operation. Safety glasses at minimum during media handling and post-blast inspection. Replace lens protectors when they become significantly abraded.
Hand & Body Protection
Heavy leather or blast-rated gloves. Full coveralls to prevent media embedment in skin and clothing. Hearing protection — blast operations typically exceed 85 dB(A) at the operator position.
Ventilation Requirements
Blast room must have a dust collection system sufficient to maintain visibility and meet OSHA PEL limits for the specific media and paint debris dust generated. Design ventilation to flow across the operator’s back and away from the work, so the operator is always in clean air.
Lead Paint Protocol
Pre-1978 vehicles may contain lead paint. Pre-blast lead testing with XRF or wipe sample test kits is mandatory before blast operations on any vehicle of unknown paint history. If lead is detected, OSHA Lead Standard 29 CFR 1910.1025 or 1926.62 applies in full.
Waste Disposal
Spent media mixed with paint debris must be characterized before disposal. Lead-contaminated media is hazardous waste. Non-lead standard automotive paint debris is typically non-hazardous solid waste. Confirm classification with a licensed waste consultant before disposal.
Common Mistakes & How to Avoid Them
1. Using Sandblasting Parameters with Plastic Media
Operators transitioning from sandblasting to plastic media often attempt to run plastic media at sandblasting pressures (60–80 PSI) to match the strip rates they were accustomed to. At these pressures, plastic media causes the same panel warping that sandblast does, and the substrate protection advantage of plastic media is completely eliminated. Plastic media works at fundamentally lower pressures than mineral abrasives — start at 30–40 PSI and work up from there only if strip rate is genuinely inadequate at the tested mesh size.
2. Neglecting to Mask Before Blasting
Blast overspray travels further than operators expect. A nozzle aimed at a door panel at 40 PSI produces a media dust cloud that can reach adjacent glass, rubber, and trim 3–6 feet away. “I’ll just be careful” is not an adequate masking strategy — the risk of etching automotive glass (which requires expensive replacement) is too high. Mask everything within 4 feet of the blast zone before starting, including windshield, door glass, rubber weatherstrip, and any chrome or trim that is to be preserved.
3. Letting Metal Sit Bare After Blasting
Bare blasted steel is far more reactive than the original painted surface because the blast process removes all surface oxide and creates a high-surface-area micro-textured profile that accelerates oxidation. Operators who blast in the afternoon and plan to prime the next morning frequently discover flash rust that must be re-addressed before priming. The 4-hour prime window is not advisory — it is the practical limit for maintaining a usable blasted surface in typical shop conditions. In humid weather, this window contracts to 2 hours or less. Plan blast sessions so that primer application follows immediately.
4. Using One Media Type for All Substrates
A shop that uses Type II Urea Mesh 20 for everything — including fiberglass panels and aluminum body work — will eventually damage a substrate. Fiberglass requires Type V Acrylic. Aluminum requires reduced pressure and finer mesh. Mixed-material modern vehicles require the aluminum parameters throughout even when some areas are steel. Media type and parameters must be selected per-substrate, not per-vehicle.
5. Ignoring Nozzle Wear
A worn nozzle bore increases in diameter and becomes bell-shaped internally, which drops exit velocity, widens and diffuses the blast pattern, and reduces strip rate. Operators compensate by increasing pressure, which increases media consumption, energy cost, and substrate impact energy — effectively recreating the conditions that cause warping while believing they are running the “same” setup as before. Measure nozzle bore at the start of each shift or every 8 hours of blast time, whichever comes first, and replace when bore has worn beyond the manufacturer’s wear limit (typically 1/16 inch oversize for a 3/8-inch nozzle).
6. Applying Filler Directly Over Bare Blasted Metal
Polyester body filler applied directly over bare blasted steel — without an intermediate epoxy primer coat — is a common and costly mistake. The filler’s porous nature allows moisture migration to the metal-filler interface, which causes corrosion under the filler and eventual adhesion failure of the entire repair. Always apply an epoxy primer, allow it to cure per specification, and then apply body filler over the cured epoxy. The epoxy seals the metal from moisture and provides a compatible bonding surface for the filler.
Frequently Asked Questions
Will plastic media blasting remove rust, not just paint?
Plastic media blasting removes surface rust scale and rust staining effectively, revealing the clean metal underneath. However, it does not chemically convert or penetrate deep pitting corrosion — rust that has created pits in the metal surface will be revealed by blasting (which is valuable for damage assessment) but not eliminated. Pitting that remains after blasting must be treated with a rust converter or chemical phosphating treatment before priming. Deeply rusted metal that has lost structural integrity cannot be recovered by any surface preparation method and must be cut out and replaced with new steel.
Can I rent plastic media blast equipment for a one-time project?
Yes — portable plastic media blast pots are available from equipment rental companies and blast equipment suppliers in many markets, though availability varies by region. The challenge with renting for a single project is that a proper automotive blast setup also requires an adequate compressor (typically 25–50 HP minimum for sustained operation), a media reclaim system if you want to reuse media economically, and personal protective equipment. The compressor is often the limiting factor — most rental companies’ standard air compressors are undersized for sustained blast work. For a one-time full-body strip, contracting a mobile blast service that brings their own compressor and media system is often more practical and economical than renting equipment and purchasing media for a single use.
How long does it take to strip a full vehicle body with plastic media?
For a fully disassembled vehicle shell with an experienced operator and properly set-up equipment, a complete exterior strip including door jambs, engine bay, and trunk typically takes 4–8 hours of active blast time depending on vehicle size, coating system thickness, and equipment efficiency. Adding floor pans and firewall extends this to 6–10 hours. These times assume an experienced operator with a properly calibrated blast system — first-time operators or undersized equipment can double these estimates. Note that total project time is substantially longer: vehicle disassembly, masking, post-blast priming, and cleanup can double or triple the active blast hours in total project time.
Is plastic media blasting safe for the factory spot welds and seam welds on a unibody vehicle?
Yes — properly controlled plastic media blasting does not damage factory spot welds or MIG seam welds. The mechanical impact energy of plastic media at automotive blast parameters is well below the threshold that would affect weld integrity. Chemical stripping, by comparison, can penetrate weld seams and attack the adhesive used in modern spot-weld bonded panels, and the neutralization requirement creates risk of chemical contamination in weld seams. For unibody vehicles, plastic media blasting is actually the preferred strip method over chemical dipping specifically because it does not penetrate sealed seams or interact with weld adhesive.
What should I do if I see flash rust appearing on the panel within minutes of blasting?
Flash rust appearing within minutes of blasting indicates either very high ambient humidity (above 70–80% RH) or that the metal temperature is at or below the dew point temperature, causing moisture condensation on the freshly blasted surface. Address this by: (1) checking and correcting blast room humidity with dehumidification equipment; (2) warming the vehicle before blasting if the metal is cold (below 50°F / 10°C); (3) moving to a waterborne rust inhibitor spray applied immediately after blasting in each section before moving to the next; or (4) applying a self-etching primer system that is specifically designed for application over flash-rusted surfaces. Do not attempt to sand or re-blast flash rust — this creates a cycle where the re-blasted surface simply re-rusts again in the same conditions. Fix the environmental conditions first.
过滤器